Got a spam problem? After my company “upgraded”our mail server at my day job, we went from getting a few spam emails a day to hundreds. It was crippling. The Microsoft Outlook application for Mac has a built-in Junk Mail feature, but it sucks. And my IT department is too busy to care. So I had to take control of the situation myself. And I did. I now hardly ever get a spam email in my inbox.
This tutorial will show you how to install and setup SpamSieve, the ultimate Microsoft Outlook spam blocker, and filter out almost 100% of all junk mail from your inbox.
This tutorial will concentrate on Microsoft Outlook but SpamSieve works on a variety of Mac email clients including Apple Mail, Airmail, GyazMail, MailMate, Mailsmith, Postbox, PowerMail, Emailer, Microsoft Entourage, Eudora, MailForge, Outlook Express, and Mozilla Thunderbird. Please read SpamSieve’s requirements section for more details and supported versions of these apps.
This tutorial will take you about 10-15 minutes.
Requirements:
01) Download SpamSieve
SpamSieve is a collection of AppleScripts for Macintosh OS X that learns and adapts to the specific types of junk mail that normally get in your inbox and block it. SpamSieve has won multiple awards and has an impressive collection of testimonials from famous users like David Pogue from The New York Times.
SpamSieve has a free trial version but the full version costs $30. When you think about how much time you spend a day managing your junk mail, $30 is well worth it. You can download SpamSieve here.
02) Open the .dmg file
SpamSieve will download to your Mac as a .DMG file or a Mac OS X Disk Image. Double-click on the image to open it.
03) Copy SpamSieve into your Applications folder
After you open the disk image, you will see a folder containing the SpamSieve app. Drag the SpamSieve icon into the Applications folder for your Mac.
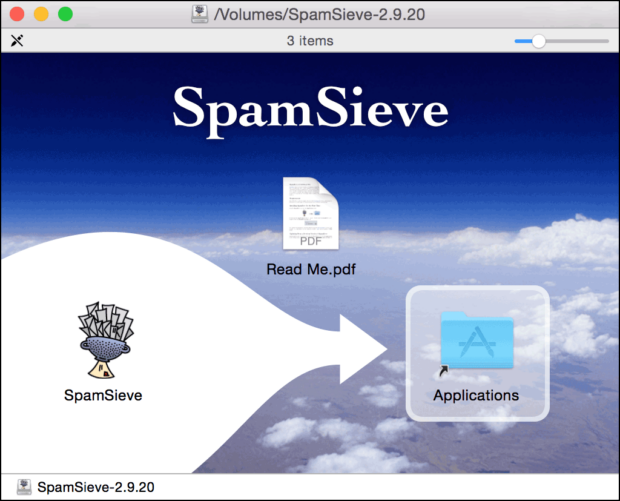
Do not double-click on the app while it’s still on the disk image. Copy it into your Applications folder! SpamSieve’s scripts need to know where SpamSieve is located. If you install SpamSieve in any folder on your hard drive besides your Applications folder, then SpamSieve may not function properly.
04) Eject SpamSieve Disk Image
You can now eject the SpamSieve disk image by dragging it into the Trash icon in your Dock.
05) Turn off Junk E-Mail Protection
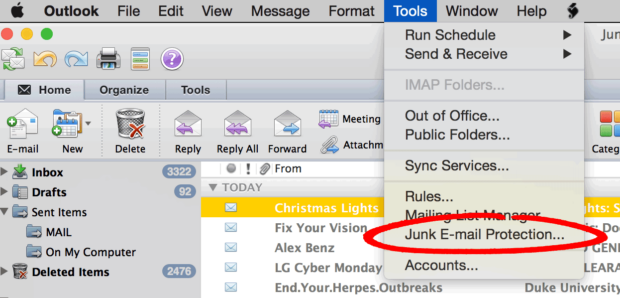
Microsoft’s junk email prevention is a joke. We need to turn it off so it doesn’t conflict with SpamSieve. Launch the Microsoft Outlook app. From the Tools menu in Outlook, select Junk E-Mail Protection.
Microsoft Outlook > Tools > Junk E-Mail Protection
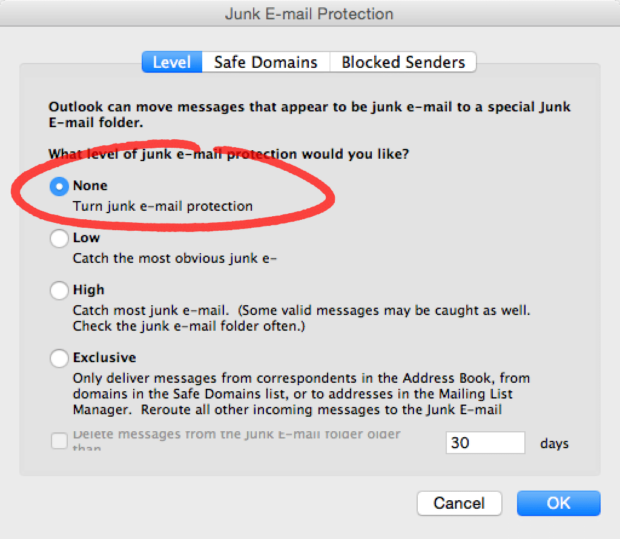
Select “None” and then click OK.
06) Open SpamSieve’s Preferences
Double-click on the SpamSieve application icon to open the program.
Macintosh HD > Applications > SpamSieve
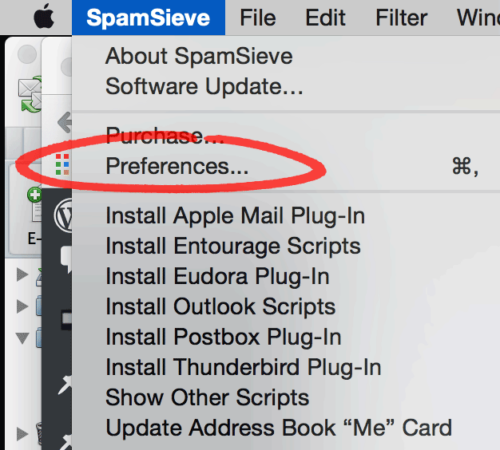
Go to the SpamSieve menu and choose Preferences.
07) Enable Outlook Address Book
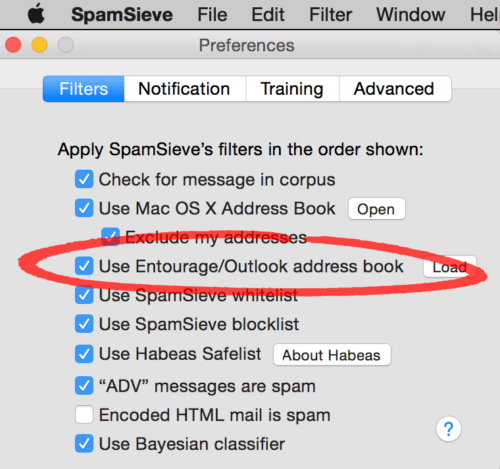
From SpamSieve’s Preferences screen, make sure that “Use Entourage/Outlook address book” is selected. Then click on the Load button.
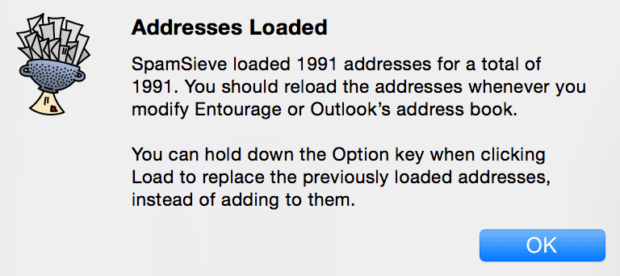
After your address book loads (it will take longer if you have a big one) a pop-up screen will ask you to chose Entourage or Outlook. Click on the Outlook button.
08) Install Outlook Scripts
Now you need to add SpamSieve’s scripts to Outlook.
- Choose “Install Outlook Scripts” from the SpamSieve menu.
- Quit Outlook.
- Re-launch Outlook
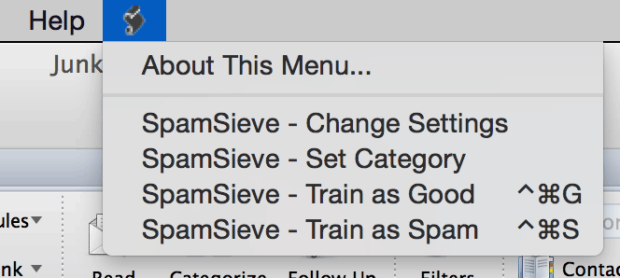
You should now see the following SpamSieve scripts under the AppleScript menu in Outlook:
09) Create Outlook Rules to Use SpamSieve
We’re almost done. SpamSieve’s scripts are now installed, we just need to tell Outlook when to run them by creating Rules.
From Outlook’s Tools menu, select the “Rules” option.
We will need to create 2 different rules that will run locally on your computer. If you are on an Exchange server, make sure you add your rules under “On My Computer” and not under “Exchange Server.”Otherwise they won’t work.
10) Create “Set Category” Rule
The first rule we are going to create will help SpamSieve classify your emails.
- Click on the + button to create a new rule.
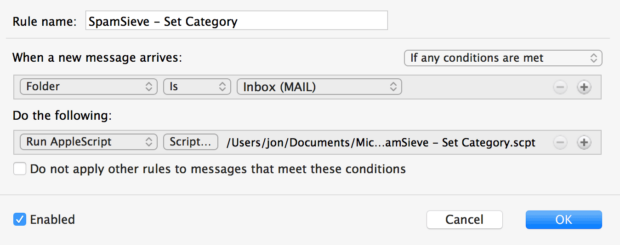
- Configure the rule to look exactly like this screenshot. Delete any default options.
Rule Name:
- Name the rule “SpamSieve – Set Category”
When a new message arrives:
- If you have a POP account, Under “When a new message arrives” it should say “All Messages”.
- If you have an IMAP or Exchange account, under When a new message arrives it should say Folder Is INBOX ().
- “If any conditions are met”
Do the following:
- Select Run AppleScript.
- Click on the “Script” button and select the “SpamSieve – Set Category.scpt” file. It should be in the “Outlook Script Menu Items” folder.
- Macintosh HD > Users > YOU > Documents > Microsoft User Data > Outlook Script Menu Items > SpamSieve – Set Category.scpt
Do not apply other rules:
- Make sure this is unchecked.
Click OK.
11) Create “Move Messages” Rule
Now we need to create our second rule. It will move email messages after the first rule classifies them.
- Click on the + button to create a new rule.
- Configure the rule to look exactly like this screenshot. Delete any default options.
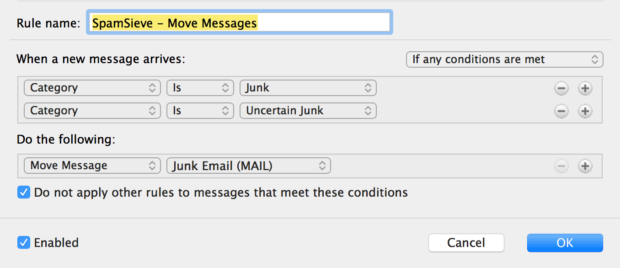
Rule Name:
- Name the rule “SpamSieve – Move Messages”
When a new message arrives: You will need to add 2 conditions here.
- Change the 3 drop down menus to say “Category” / “Is” / “Junk”
- Change the 2 drop down menus to say “Category” / “Is” / “Uncertain Junk”
Do the following:
- Change the 2 drop down menus to say “Move Message” / “Junk E-mail (On my computer)”
Do not apply:
- Make sure this is checked.
Click OK.
12) Organize and Order Your Rules
This is important. Rules that are listed first are executed first. Order your rules like this:
- Drag the SpamSieve – Set Category rule to the top of the list.
- Drag the SpamSieve – Move Messages rule so that it is just below the SpamSieve – Set Category rule(s) (and above any of your other rules).
13) Training
The more you train SpamSieve, the smarter it gets.
- To train SpamSieve with spam messages, select one or more of them and then choose SpamSieve – Train as Spam from Outlook’s Scripts menu.
- To train SpamSieve with good messages, select one or more of them and then choose SpamSieve – Train as Good from Outlook’s Scripts menu.
14) What About iOS?
Unfortunately SpamSieve does not run on iOS (yet). This is due to the limitations of the iOS platform. But as long as your email account is setup as IMAP or Exchange, your Mac is on and your email client open, then SpamSieve will filter out your spam emails before it gets to your iPhone, iPad, or iPod touch. This is described in more detail here on the iPhone Spam Filtering section on SpamSieve’s website.
15) That’s It!
Congratulations! For now on, your inbox should now be (mostly) spam free. Just occasionally to scan your Junk folder for good messages that might have slipped through and continue to train SpamSieve.
Another cool feature of SpamSieve is that you can use it with multiple email accounts and email clients on your Mac at the same time. SpamSieve will share its training data and get smarter across all of your accounts.
Thanks for reading and please post a comment below if you have questions.

Frank Wilson is a retired teacher with over 30 years of combined experience in the education, small business technology, and real estate business. He now blogs as a hobby and spends most days tinkering with old computers. Wilson is passionate about tech, enjoys fishing, and loves drinking beer.



 Example Of Incredibly Bad Website Design: LibertyVan.com
Leave a Reply
You must be logged in to post a comment.