Adobe Photoshop is a powerful tool that can be used to create realistic and beautiful images. In this Photoshop tutorial, you’ll learn how to create transparent clouds from stock photo images.
Whether you want to add a touch of whimsy to your photos or create a dramatic sky scene, adding a few clouds will do the trick. And if the clouds are on a transparent layer, then you can easily move the clouds to where you want them in your Photoshop projects.
Creating transparent clouds in Photoshop is actually quite easy, once you know the steps. And the best part is, you can customize your clouds to look any way you want. So get ready to take your Photoshop skills to new heights! Let’s get started on our cloud adventure.
Don’t worry, you don’t need to be either a meteorologist or a professional graphic designer to follow this tutorial. Just a basic understanding of Photoshop will do. Here is an easy beginner tutorial on how to make transparent clouds in Adobe Photoshop.
Requirements:
- Adobe Photoshop ($99+) (any version after Photoshop 3.0 will work)
- A photo of a cloud (high resolution is preferred)
- ~10 minutes
Open A Photo Of Clouds

If you need a photo of clouds, try searching for an isolated cloud in a blue sky using a free stock photo site like Pixabay.
- Open a cloud picture in Photoshop.
TIP: Use a high-resolution cloud image as your starting point. This will give you more detail to work with and make your clouds look more realistic.
NOTE: Depending on your cloud photo, you might be able to use Photoshop’s Object Selection Tool. This will allow you to make a quick selection of your cloud. However, the edges are usually fuzzy, and the cloud texture can get lost when using the Object Selection Tool. I’ve found following the steps in this tutorial to be more successful.
Convert The Image To Grayscale

It feels like such a shame to remove the color from your cloud photo, but we don’t need it. Converting your image to grayscale will make it easier to cut out clouds. It will also allow your transparent cloud to blend better in future graphic design projects.
- Convert the image to Grayscale. (Image > Mode > Grayscale)
Adjust Levels To Isolate Your Cloud

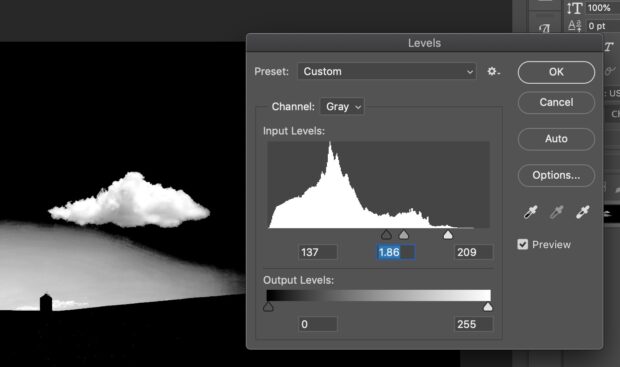
You should now have a grayscale photo of a cloud. The next step is to adjust the Levels of the picture so that the sky is darker than the cloud.
- Image > Adjustments > Levels
- Adjust the Levels to make the blacks darker but not too dark. Don’t worry about making the entire sky black; just focus on darkening the sky around the edge of your cloud(s).
- If you adjust the white levels, don’t “white-out” your cloud. You want the cloud texture to stay intact.
TIP: Try to keep the different shades of gray and white in your cloud. It will create depth and realism.
Blacken The Sky Around The Clouds

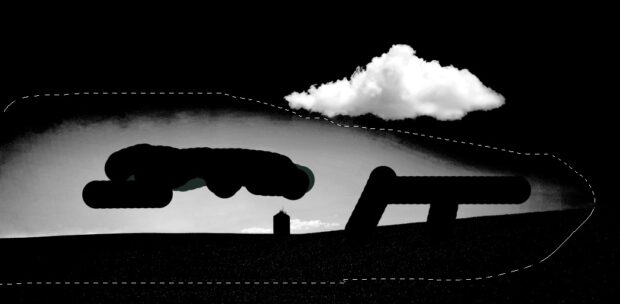
Next we want to clean up the area around the clouds. You want your cloud isolated and surrounded by black.
- Use the Brush, Lasso, or other tools to blacken the sky around your clouds.
- Keep touching up your photo until you have a white shaded cloud on a black background.
Convert Image To RGB

Let’s go back to RGB color.
- Convert the image back to RGB Color. (Image > Mode > RGB Color)
Make A Solid Blue Background

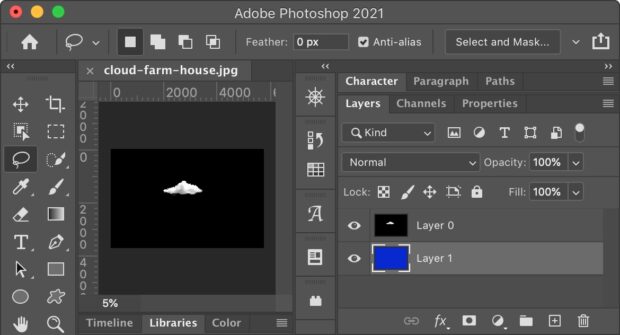
Create a new layer, fill it blue and then put it behind your cloud layer.
- Layer > New Layer
- Edit > Fill > Color (select a color)
- If your cloud layer has a lock icon or the word “Background” in italics, double-click on it, rename it.
- Move the blue solid layer behind your cloud layer to the bottom of your Layers stack.
Add A Layer Mask To The Cloud Layer
This is the most important step of this tutorial. Follow the directions closely.

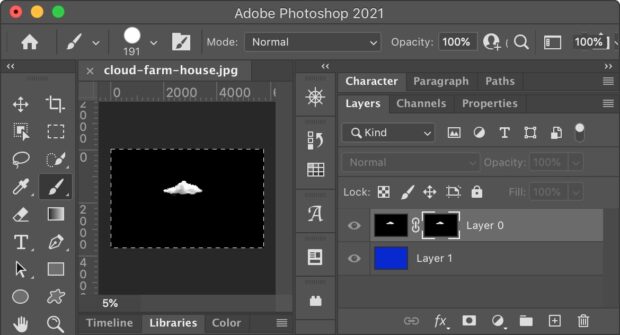
- Select your cloud layer in the Layers window (Select > Select All)
- Then copy the layer (Edit > Copy)
- Add a Layer Mask (Layer > Layer Mask > Reveal All). This will add a white box (Layer Mask Thumbnail) directly to the right of the Layer Thumbnail.
- To work on the Layer Mask, you first have to select it. Hold down the Option key (Mac) or Alt key (PC) and click on the Layer Mask Thumbnail to the right of your cloud layer. You should now see just a blank white screen.
- Paste your cloud. You should still have your cloud copied to your Clipboard. Paste it to the Layer Mask (Edit > Paste).
- To exit the Layer Mask view, just click on your solid layer.
- Your cloud should now be isolated. Try turning the visibility of the solid color layer on and off. Is your cloud floating?
Make Your Cloud Layer Solid White
- Click on your cloud layer and Select All. (Edit > Select All)
- Fill the layer completely white. (Edit > Fill > Color > White)
Touch-Up The Mask
Let’s soften the edges around your cloud. It will make it blend better in future Photoshop projects and not have such a hard edge. Even in real life, clouds with hard edges look fake. Like cotton balls.
- Click on your Layer Mask.
- Choose black as your foreground color.
- Set up a soft brush. Try a wide brush size, like 100 pixels, 0% hardness and a low transparency, like 8%. By painting black in the Layer Mask, you are slightly erasing the light edge surrounding your clouds. Take your time; the clouds will look better.
TIP: You can also use other Photoshop tools, such as the Smudge Tool and the Dodge and Burn Tool, to refine your clouds.
Prepare Your Transparent Clouds For Future Use
- Make a copy of your cloud layer, just in case (Layer > Duplicate Layer).
- Apply your Layer Mask. (Layer > Layer Mask > Apply)
- Save the file as a layered TIF or PSD file, or export the file as a PNG with transparency. (File > Export > Export As…)
- You now have some transparent clouds. Once you’re happy with your clouds, you can add them to other images or use them as standalone pieces.
- I used the transparent cloud image in this tutorial in an image of Batman changing a tire on the Batmobile.

Now You Know How To Make Transparent Clouds In Adobe Photoshop
What did you think about this beginner Adobe Photoshop tutorial on how to make transparent clouds? Easy? Too hard? Let us know in the comments.
And if you enjoy learning new graphic design tricks, then search MethodShop.com for more tutorials for Photoshop. Thanks for reading!
Hi, I’m Zack Applegate. I’m a technology writer at MethodShop. Please check out my articles on a variety of topics, including artificial intelligence, music, movies, and silly tech stuff like funny Elon Musk jokes and rock bands with weird names. If you have article ideas, please connect with me on Facebook.


 Bizarre Doily Art So Creepy, It Will Make You Want to Burn Your Crochet Supplies
Leave a Reply
You must be logged in to post a comment.