Table of Contents[Hide][Show]
We’ve all seen the equalizer settings in iTunes, but not many of us know how to use it to its full potential. Grammy-nominated producer, Rich Tozzoli, breaks down the iTunes equalizer settings slider by slider so you can get the most out of your music.
For those of you who want a little more or a little less, out of your music in iTunes, there is a handy built-in equalizer. This article will help you understand the iTunes equalizer settings and give you some guidance in case you want to make your very own perfect iTunes equalizer settings preset.
The iTunes Equalizer Is A 10-Band Graphic Equalizer
The iTunes equalizer (EQ) is a graphic equalizer because the selections of frequencies are displayed in a straight line. To be more specific, it’s called a 10-band graphic equalizer, since there are ten different EQ frequencies (bands) to customize.
A 10-band graphic EQ is slightly different from your home stereo equalizer, which might have just a fixed treble and bass setting. For example, when you turn up the bass, you’re only increasing one set frequency, usually around 100 Hz (hertz). The same applies if you turn up the treble knob, usually 10K (kilohertz).
The benefit of the 10-band graphic equalizer in iTunes is that you have the choice over which band you choose to increase or decrease. iTunes has frequency choices at 32, 64, 125, 250, 500, 1K, 2K, 4K, 8K, and 16K (which again stands for kilohertz). These various bands will have differing effects on the sound of your music.
Demystifying iTunes Equalizer Settings: Understanding Each Slider And What It Does
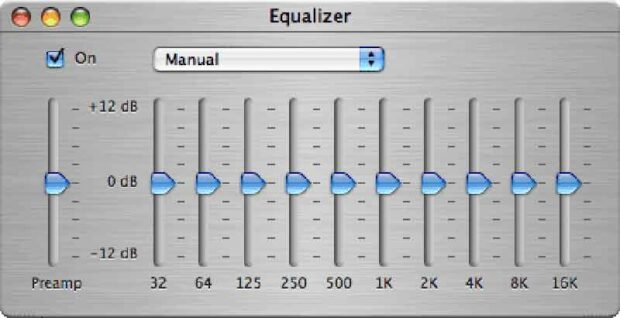
With ten different frequency sliders to adjust, there’s a lot to customize using the iTunes equalizer. Let’s start from left to right in the iTunes equalizer window and briefly discuss what each band does.
- 32 Hz: This is the lowest frequency selection on the EQ. 32 hertz sits in the lowest of low bass frequencies, where sub information resides in mixes –such as kick drums and bass instruments. Some speaker systems can’t even reproduce this frequency.
- 64 Hz: This second bass frequency starts to become audible on decent speakers or subwoofers. Again, mostly bass drums and bass instruments will reside in this region.
- 125 Hz: Many small speakers, such as in your laptop, can just about handle this frequency for bass information. In other words, if you turn it up on most systems, you’ll hear more bottom in your mix.
- 250 Hz: This is still considered low-end, but more of the “woofy” sound of bass and drum sounds. Guitars and pianos will have a large amount of low end in this frequency range.
- 500 Hz: Now we’re approaching midrange frequencies, but still some of the low end of vocals and the mids of bass instruments sit here in a mix.
- 1K: This is now a low midrange of most instruments such as guitars, pianos, snare drums, etc.
- 2K: The 2k frequency can boost or cut the “nasal” sound of your music, in the range your voice makes when you hold your nose and talk.
- 4K: 4k is the upper mid-range that many electric guitars sit in, as well as a large portion of many instruments.
- 8K: This is the start of the high end. The majority of cymbals, hi-hats, the upper range of synths, pianos, and guitars can all be adjusted here. Many vocals also have a lot of information in this range.
- 16K: Theoretically, we humans can hear just above 20K, so this is the high end. If you crank this up, your mixes will sound ‘sizzly.’ This is the top of the high end on the iTunes equalizer.
The Best iTunes Equalizer Settings And Presets
If you click and hold down the drop-down menu at the top of the 10-band graphic EQ (now that you already know what that means), you can choose Presets for various types of music, such as Electronic, Jazz, R&B, and Rock.
- If you choose “Electronic,” for example, you’d see most of the frequency bands on the EQ boost up, especially the lows and highs. This will have a noticeable effect on your sound, increasing the amount of low-end and high-end information in the music.
- If you chose “Treble Reducer,” it will do just that – lower the 1K thru 16K bands, therefore reducing the high end.
- A preset like “Loudness” boosted most of the low end, cut some 4K, and turned up 8K, with only a slightly larger amount of 16K. If you do that, your music will seem, well, louder!
Making Your Own Perfect iTunes Equalizer Presets
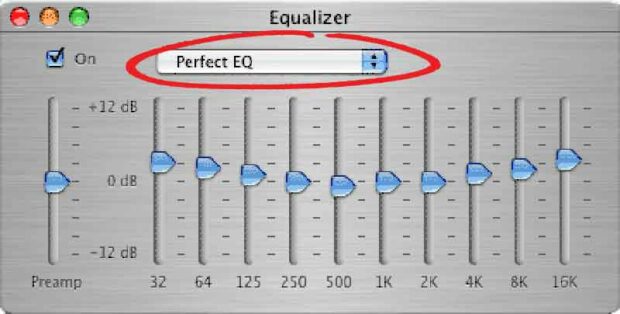
You can also make choices in the drop-down menu to edit your presets by renaming or deleting them, or you can choose the Make Preset option. This lets you save your favorite iTunes equalizer settings after you’ve moved the EQ bands up or down. I have many different settings I’ve saved, usually after calling up a Preset and changing it to my liking.
The Variable Preamp Slider
Besides the EQ sliders, there’s a variable Preamp slider to the far left. The Preamp will bring up the overall gain of iTunes, which is almost like turning up your volume on your stereo system. Be careful, though, because by turning up a preamp too much, you can overdrive your system, which creates a nasty, crunchy distortion (unless you like that kind of thing). By turning it up just a little, you can certainly get more volume out of your speakers. Combine that with some of your own 10-band graphic EQ settings, and the Equalizer can be quite a powerful tool!
Music Is Subjective, So The “Best iTunes Equalizer Settings” Will Be Different For Each User
This article contains guidance and some general information about the built-in equalizer in iTunes. As always, use your ear and common sense to get the best iTunes equalizer settings for your tastes, speaker system, and music styles. Like anything else that’s subjective, each person will have their favorites.
Special thanks to the following people for their comments: N. Ziarek, and David Ondrick. Also, thanks to the users at Digg for their engagement with this story.
How To Achieve Perfect iTunes Equalizer Settings For Your Music Share on XRelated Articles:
- Innovative Ways To Repurpose Your Old iPhone Or iPad
- Yuck! What Would Happen If You Never Took Your Earbuds Out?
- DJs And Students Find Creative Uses For The iPod
- The Real-Life Connection Between The Spinal Tap Stonehenge Scene And Black Sabbath





 The Audio Shaker – This Brilliant Audio Experiment Lets You Shake Sound
Leave a Reply
You must be logged in to post a comment.