From email newsletters to social media posts, GIFs can be a powerful way to enhance and bring emotion to your content. Here’s how to create an animated GIF in Photoshop.
There’s a famous saying: An image is worth a thousand words. If that’s true, then depending on how many frames are in your animation, a GIF can be worth several thousand words. Somewhere between a still image and a video, the GIF hybrid file type allows you to create short image animations.
The survival of the GIF image file format is very admirable. Primarily used for ugly MySpace pages and annoying animated banner ads, animated GIFs were very popular in the 1990s and early 2000s. Back then, the GIF was not a respected file type. It was a symbol of bad design and many people predicted, and even hoped, that technologies like Adobe Flash and HTML5 would kill the GIF once and for all.
Not only has this older file format survived, but it’s thrived. Animated GIFs are an excellent way to capture an online audience’s attention and bring an extra element of excitement to your content.
Creating Animated GIFs Using Adobe Photoshop Or A Photoshop Alternative
There are plenty of websites and apps that can help you make animated GIFs. Some of my favorites include GIF Brewery (Mac) and GIPHY. Many of these services will even allow you to upload a video clip and convert it into a GIF. If you aren’t familiar with Adobe Photoshop, then you should try using one of those services.
Learning Photoshop isn’t easy, but if you know your way around Adobe Photoshop and need to make an animated GIF, then this tutorial is for you. This tutorial was made using the(Amazon link) Adobe Photoshop 2020 version of Creative Cloud. If you have a different version of Photoshop, don’t worry. The basic steps of how to create an animated GIF in Photoshop will be similar in other versions of the application.
Build Your Layered Image In Photoshop
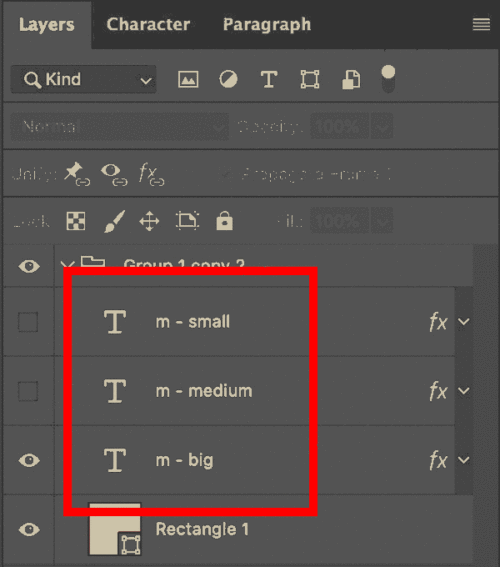
With a rough storyboard in mind, build your image project in a layered Photoshop file. In this example, I am animating the MethodShop logo. You can create folders for each frame or just compose all of the raw layers, it’s up to you. Don’t forget to name your animated GIF Photoshop layers! It will make the animation process a lot easier.
Open The Timeline Window
Once your file is ready to animate, open the Timeline window. The Timeline feature in Photoshop enables you to turn layers on and off over a period of time transforming your static image into an animated GIF.
- Window > Timeline
Create Frame Animation
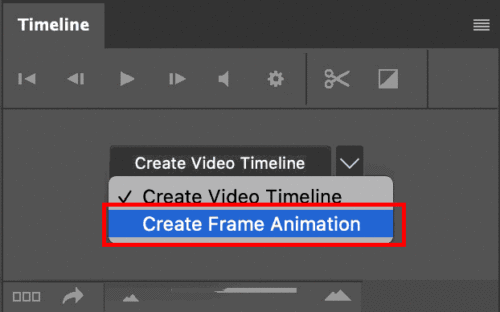
In the Timeline window, you should need a drop-down menu with two options: Create Video Timeline and Create Frame Animation. If you don’t see the drop-down, then expand your window size and it should appear. Once you see it, click on the option that says Create Frame Animation.
- Window > Timeline > Create Frame Animation
Create A New Frame For Each Frame In Your GIF Animation
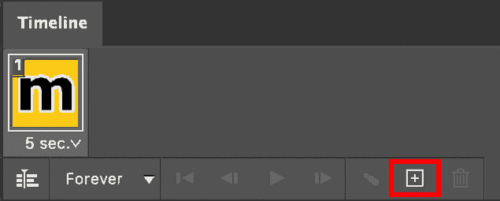
Arrange your layers for your first frame and then click on the “Create Frame” icon. Arrange your scene and Create Frame, then repeat. Each time you do this, a snapshot will be taken of your layered file. Continue creating frames for your animated GIF until you are done.
- Window > Timeline > Create Frame
If your Photoshop file is already set up with a sequence of layers for your animation, then try the Make Frames From Layers option. In the top right of the Timeline menu, there’s a three-line hamburger menu option. Click on that and then choose “Make Frames From Layers”. Your Photoshop will then get automatically sequenced into a series of frames.
- Window > Timeline > Make Frames From Layers
Adjust Frame Delay Durations
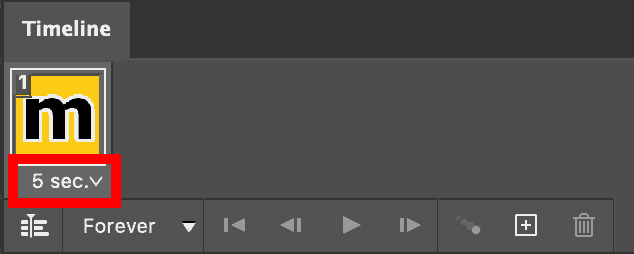
How long of a pause or delay would you like between frames? There’s a drop-down menu under each frame that allows you to customize your delay durations. Adjust the duration individually for each frame.
Do You Want A Looping GIF?
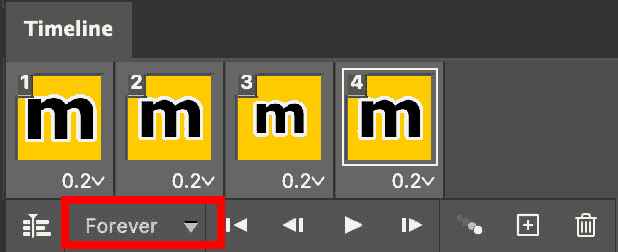
Do you want your GIF to loop? The bottom of the Timeline toolbar has an option where you can select how many times you’d like your animated GIF to loop. Select Forever if you want your image to loop infinitely. If you are creating an animated GIF banner ad, then select 3 times for your loop. Most ad networks require GIF ads to loop 3x or less or last 30 seconds or less.
Press Play And Preview Your Animated GIF
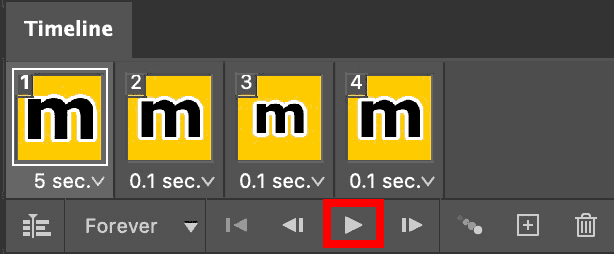
Test your animated GIF in Photoshop by pressing the Play icon. Go back and make changes by selecting the frame you’d like to modify. Then preview again until you are happy.
Save Your Animated GIF Photoshop Project
If you haven’t already, now would be a good time to save your animated GIF in Photoshop. You can save an editable file as either a PSD or layered TIF file. Both of these file types will save your frame animation data.
- File > Save
Export Your Animated GIF

Are you happy with your animation sequence? Let’s export it as a GIF animation file using the “Save for Web” option.
- File > Export > Save for Web (Legacy)…
Adjust Your GIF File Export Options
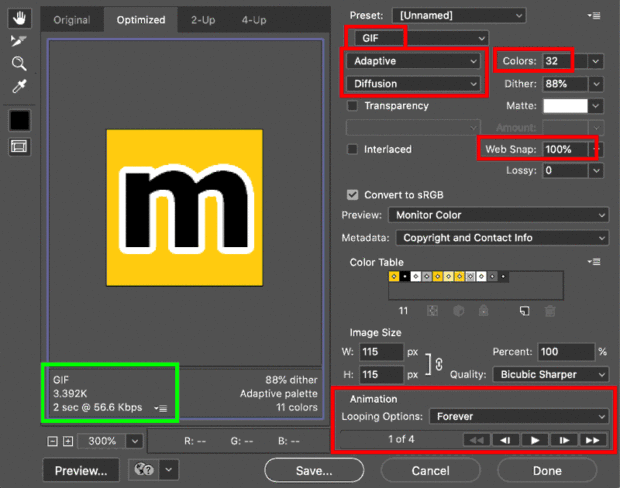
Not all GIF settings should be the same. You can make a variety of custom adjustments to your animated GIF in Photoshop before exporting it. Here are some of the most important settings that you can customize. Your goal should be to find a balance of settings that both make your file look great and keep your file size as small as possible.
- File Type: You must select GIF, not JPG, WBMP, or PNG. If you don’t select GIF, then you will end up with a still image that doesn’t animate.
- Color Palette: You will probably get the best results with either an Adaptive or Perceptual color pallette but you can try experimenting with other options.
- Dither: If you have a lot of gradients in your animation, then choose Diffusion, Pattern, or Noise as one of your Dithering options. This will attempt to create a gradient effect using dots. But if your GIF is all solid colors, then select No Dither.
- Colors: The most important option on this screen is your color count. Using more colors will increase your file size. Less is less. Try to get this number as low as possible. Using fewer colors will decrease your file size.
- Web Snap: An easy way to decrease file size is to restrict your file colors to standard web colors. Try to get your Web Snap percentage as high as possible without making your image look like crap.
- Animation: Don’t make all of your file adjustments based on a single frame in your animation. Toggle back and forth between frames while you experiment with your settings.
Save Your GIF Animation

That’s it! You just made an animated GIF in Photoshop! The final step is to click the Save button in the bottom right of your screen. This will save your animated GIF file on to your computer. Open your GIF in a web browser and test it out. Then, if necessary, go back and make any adjustments.
After You Create Your Animated GIF In Photoshop, Where Should You Use It?
Congrats! You just made an animated GIF in Photoshop. Here are some of the places that you can use your GIF:
- Social Media: Social media sites including Facebook, Pinterest, and Twitter all accept GIFs. They didn’t initially, but all started accepting GIFs in 2015.
- Presentations: You can also use your GIF in presentations using Microsoft PowerPoint or Google Slides.
- Emails: You can’t include rich media content, like videos, in an email. But you can use a GIF. Adding GIFs to newsletters is becoming a very popular tactic.
- Websites: You can use GIFs to help bring your blog posts to life. Here’s an example.
- Advertising: Although not as popular as HTML5 ads, GIF banner ads are still very common online. Many ad networks have restrictions on GIF ads. In general, you should try to keep your GIF banner ads under 150 kb and your animations under 30 seconds with a max loop of 3x.
The History Of The GIF File Format
GIF is an acronym for Graphics Interchange Format. The GIF image file format was created by the dial-up Internet service company CompuServe in 1987. Although GIFs may not look as clean or be as small as JPG files, GIFs have two major advantages over other web-compatible image file types: transparencies and animation.
How to Create an Animated GIF in Photoshop ... #PhotoshopTutorial #PhotoshopLife #PhotoshopTutorial #GIFlife #GIFs #Tutorial #PhotoshopArt #Photoshopped #PhotoshopCC Share on XRelated Articles:
- Adobe Won’t Let You Photoshop Money Unless You Do This…
- Missing Missy: The Lost Cat With A Photoshop Battle
- Famous Works Of Art Photoshopped With Apple Airpods
- BP Caught Photoshopping Deepwater Horizon Photos

Frank Wilson is a retired teacher with over 30 years of combined experience in the education, small business technology, and real estate business. He now blogs as a hobby and spends most days tinkering with old computers. Wilson is passionate about tech, enjoys fishing, and loves drinking beer.



 How To Enable Amazon Seller Vacation Mode And Put Your Listings On Hold
Leave a Reply
You must be logged in to post a comment.