Making a Die Hard Christmas ornament is a fun DIY project for fans of the classic 1988 movie. This tutorial will guide you through the steps to create your own unique Die Hard holiday decoration.
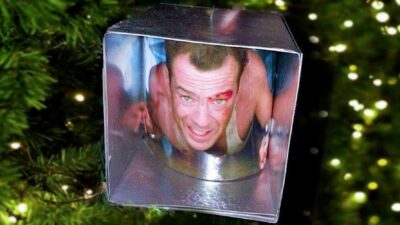
Why Is The Ventilation Shaft Scene From Die Hard Such A Popular Christmas Ornament?
One of the standout scenes from the first “Die Hard” film is when Bruce Willis‘ character, John McClane, crawls through a ventilation shaft to evade the terrorists who have taken over the Nakatomi Plaza building. This scene showcases McClane’s quick thinking and bravery, making him a fan-favorite action hero.
NERD NOTE: Actor Bruce Willis was born on March 19, 1955, in Idar-Oberstein, Germany. Willis grew up in New Jersey, where he began his acting career in theater productions. He rose to fame in the late 1980s after starring in the hit film “Die Hard,” which established him as an action movie star. Willis appeared in numerous films during his acting career, including “Pulp Fiction,” “Sin City,” and “The Sixth Sense”.
Add Some Movie Magic to Your Holidays with This 'Die Hard' Ornament DIY Project … #ChristmasOrnament #DIY #HolidayCrafts #DieHardFans #ChristmasCrafts Share on XHow To Create Your Own Die Hard Christmas Ornament: A Step-by-Step Tutorial
Making a “Die Hard” Christmas tree ornament (with a picture of Bruce Willis as John McClane inside a small tin foil-covered cardboard box) is a fun DIY project for all fans of the classic movie. This tutorial will guide you through the necessary steps to create your own unique Die Hard Christmas ornament.
Materials Needed:
- Small cardboard box about the size of an avocado
- Silver spray paint ($7 via Amazon), silver duct tape ($3 via Amazon), or tinfoil ($3 via Amazon). You only need on item from this list.
- A picture of Bruce Willis as John McClane (see below)
- Scissors or Exacto knife ($4 via Amazon)
- Decorative ribbon ($1 via Amazon)
- Mini LED candle light and plastic wrap (optional)
Find A Small Cardboard Box
Look around your home or office for small boxes. You want a small cardboard box approximately 2-3″ inches deep by 3″ tall and 4″ wide. Small rectangle boxes work best. Look for a small box that’s roughly the size of an avocado.
Are you currently at work? Have you recently ordered new business cards or printer ink? Those boxes are perfectly sized for this project.
Cut Out The Side Of Your Cardboard Box
Once you find a suitable box, cut out one of the sides of the box to create a place for your John McClane photo.
Bring the Action to Your Holidays with this DIY Die Hard Christmas Ornament Tutorial … #ChristmasOrnament #DIY #ChristmasDecoration #HolidayCrafts #DieHardFans Share on XMake Your Box Look Like A Section Of An Aluminum Ventilation Shaft
Next, we need to convert the cardboard box into the aluminum ventilation duct that Bruce Willis crawled through in Die Hard.
Here are 3 ways to make your cardboard box silver. Chose an option that matches your available supplies and timeline.
- Silver Spray Paint: (Time ~1 day) I think the silver spray paint ($7 via Amazon) option looks the best, but it takes longer for the spray paint to dry and air-out. Carefully spray paint your small cardboard box, both inside and out. You will probably need to do a few coats. Let the paint dry thoroughly, or you risk getting wet spray paint on your Christmas tree. Also, you should let it air out for at least a day before bringing it inside.
- Duct Tape: (Time ~10 minutes) This option is the fastest and easiest. I’ve even made impromptu Die Hard Christmas ornaments at work a few times using duct tape. Cover your cardboard box both inside and out with silver duct tape ($3 via Amazon). BTW you can also buy Aluminum Foil Tape ($3 via Amazon) which also looks awesome!
- Tinfoil & Glue: (Time ~1 hour) This option is the hardest. Measure and cut sections of aluminum foil ($3 via Amazon) for all sides of your box. Inside too! Then glue your tinfoil to each side of the box with the shiny side out. The best glue to use for tinfoil is a craft glue, such as a PVA glue ($6 via Amazon), white glue, or hot glue. These glues are easy to apply, create a strong bond, and are non-toxic.
When you are done, the end result should be a nice silver box with one open side.
Measure The Opening Of Your Cardboard Box
Measure the opening in your box for both width and height. To get the curved effect, you need to print out your Bruce Willis photo the same height as your box and slightly wider.
For example, if you have a 4″ inch wide box, then you should print out your photo 5″ inches wide. It also helps to leave some extra padding on the sides to help position the Bruce Willis photo inside the box.
PRO-TIP: Once you know the size that you want the photo to be, you can create a shape that exact size in Microsoft PowerPoint or Google Slides. Then import your Bruce Willis photo and resize it to match the shapes.
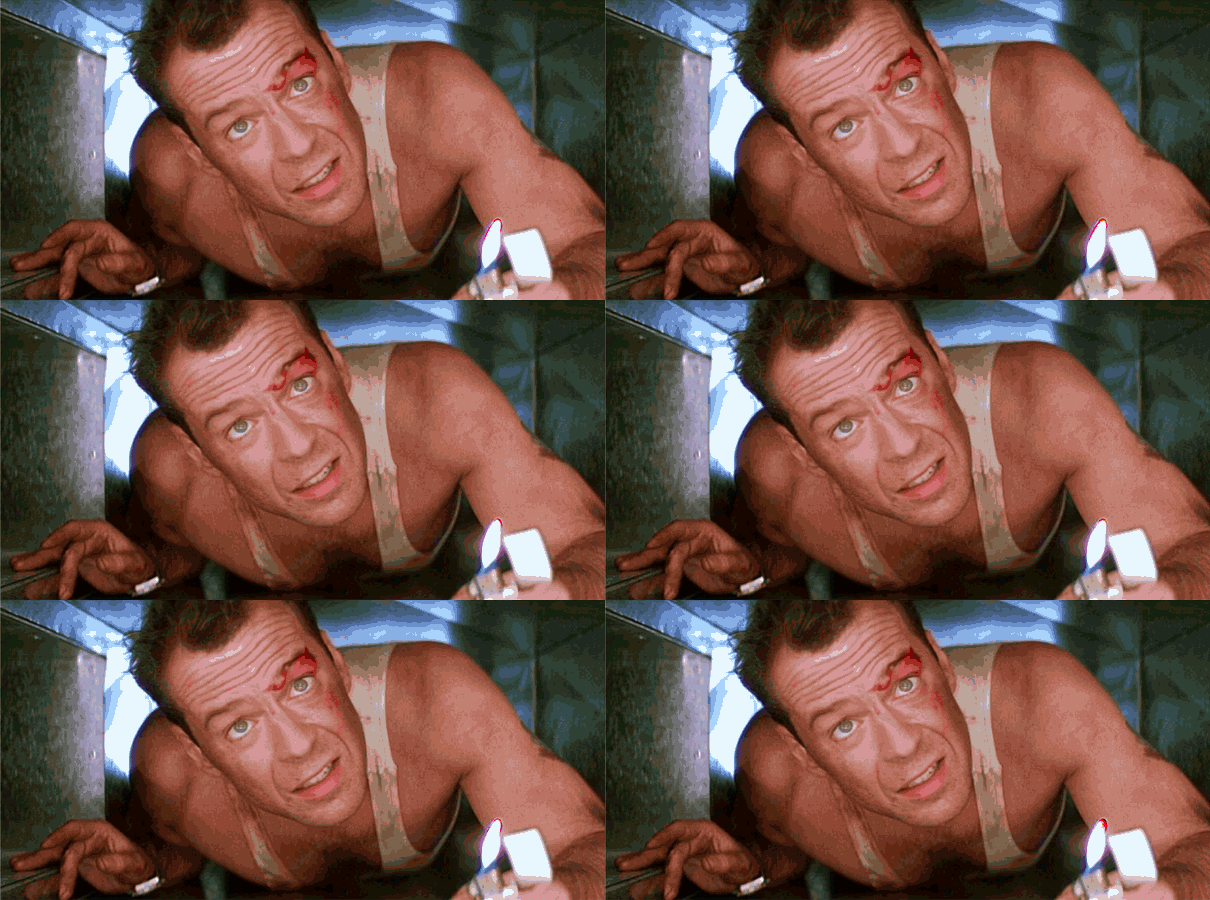
Print Out This Bruce Willis Picture From Die Hard
Download this ‘DIY Die Hard Christmas Ornament Tutorial Print Out PDF’ and print it on a color printer. High-quality paper looks the best if you have it.
Add A Hanging Ribbon
What good is your DIY Die Hard ornament if you can’t hang it up? Let’s add a ribbon ($1 via Amazon) so you can hang it on your Christmas Tree.
- Grab a piece of ribbon, about 7″ long.
- Using your scissors, carefully punch a hole in the top center of the box.
- Feed one end of the ribbon through the hole. Then tie a large knot on the end of the ribbon inside the box, so it won’t pull through.
- For the ribbon end on the outside, tie a loop large enough to go around a tree branch.
Insert The Picture Of Bruce Willis Inside The Box
If needed, trim your photo of Bruce Willis as John McClane, and then put it inside the box. Make sure the photo is centered. You’ll want the picture to bend, so it has a 3D effect.
Flickering Zippo Lighter – Special Effect (OPTIONAL)
If you want to add a flickering lighter effect to your Die Hard Christmas decoration, then you’ll need the following items:
- Plastic wrap
- Mini LED candle light ($0.50 each via Amazon)
- Razor blade or Exacto knife ($4 via Amazon)
- Scotch tape
You can make the fire from Bruce Willis’ Zippo flicker by following these few extra steps:
- Use a razor blade or Exacto knife to carefully cut out the tiny lighter flame from the printed photo.
- Take a small wade of plastic wrap and tape it to the back of the photo. This will give the light some material to reflect onto.
- Turn on your mini candle light and place it behind the Bruce Willis photo
Proudly Display The Die Hard Christmas Ornament On Your Holiday Tree, Or Give It Away As A Die Hard Fan Gift!
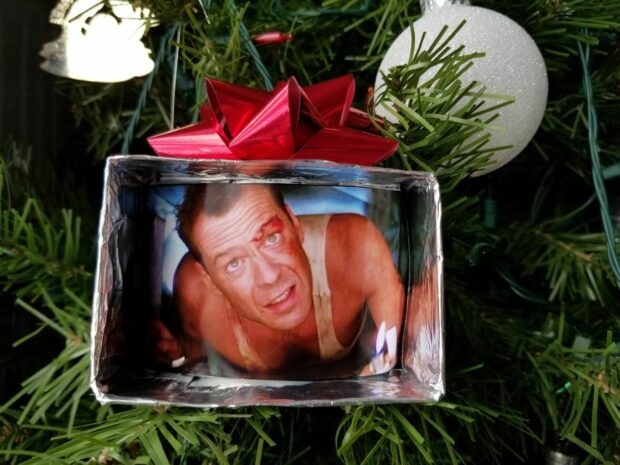
Congrats! This DIY Die Hard ornament tutorial is now complete. Proudly display your new decoration on your holiday tree or anywhere else you’d like to add a little more Yippee-Ki-Yay.
Or if you are feeling especially festive, this ornament makes a great Die Hard fan gift! Make a bunch of these and give them away to your friends.
Thanks again for reading! If you are really happy with your DIY Die Hard holiday decoration, then please share it with us in the comments below or tag us on social media. Thanks!
NERD NOTE: The role of John McClane in “Die Hard” was originally offered to several popular Hollywood stars. Both Arnold Schwarzenegger and Burt Reynolds turned down the part. Despite not being the producer’s first choice, Bruce Willis brought a unique mix of humor and grit to the role, helping make the film a classic. The success of “Die Hard” solidified Willis as a movie action hero, and he went on to reprise the role in several sequels.
A Fun And Easy Xmas DIY Project: How To Make A Die Hard Ornament … #DIY #ChristmasDecoration #HolidayCrafts #DieHardFans #ChristmasCrafts #BruceWillis Share on X
Frank Wilson is a retired teacher with over 30 years of combined experience in the education, small business technology, and real estate business. He now blogs as a hobby and spends most days tinkering with old computers. Wilson is passionate about tech, enjoys fishing, and loves drinking beer.



 65 Famous Christmas Quotes That Also Make Great Christmas Dinner Toasts
Leave a Reply
You must be logged in to post a comment.