Is the battery life of your iPhone no longer lasting a full day? From your battery’s age to apps that wastefully use power in the background, there are several factors that can contribute to poor iPhone battery performance. Here are some power wasting iPhone settings that you can easily disable and other tricks to help increase your daily iPhone battery life.
Table of Contents[Hide][Show]
iPhone Settings That Will Drain Your Battery+−
- Prevent Apps From “Always” Using Your Location In Location Services
- Turn Off System Services
- Opt Out Of Sharing Analytics & Improvements With Apple
- Turn Off Personalized Ads
- Disable Tracking
- Disable In-App Ratings & Reviews Requests
- Push Mail
- Turn Off Background App Refresh
- Delete As Many Apps As Possible
- Put Your iPhone Into Low Power Mode
- Understanding iPhone Battery Health
- Easy iPhone Battery Saving Tips
iPhone Settings That Will Drain Your Battery
To Apple’s credit, they are constantly creating new apps and features for the iPhone’s operating system, iOS. But as you update the software on your iPhone, the older hardware will sometimes struggle to facilitate the newer software features. These new features will still work, it’s just that your phone will need more battery power to execute them.
These settings are the biggest offenders. Don’t worry, we will walk you through the options for each setting.
- Location Services
- System Services
- Analytics & Improvements
- Personalized Ads
- Tracking
- App Review Requests
- Push Mail
- Background App Refresh
Here are some easy iPhone battery saving tips that only require you to disable the following iPhone settings.
Here Are All The Bloated iOS Settings That Kill iPhone Battery Performance And How To Disable Them #iphonebattery #iphone #battery #lowbattery #iphonetips Share on XPrevent Apps From “Always” Using Your Location In Location Services
Beyond basic privacy concerns, allowing apps to constantly track your location will drain your iPhone’s battery in the background. And a lot the apps and games on your iPhone have no legitimate reason to need to know your location.
Settings > Privacy > Locations Services
- Open the Settings app
- Select Privacy
- Select Location Services
Once you navigate to the Location Services screen in the iOS settings app, you’ll see three main settings, a Location Services toggle switch, Share My Location, and the ability to individually control how each app installed on your phone gets to use your location information.
- Location Services: If you’re super paranoid and just want to nuke all Location Services on your iPhone, then just tap the Location Services toggle and kill all apps from knowing your location. Although that’s an option, I don’t suggest it unless you just want to put yourself into stealth mode. Apps like Maps, Uber, Airbnb and Calendar all work better when they know where you are.
- Share My Location: The Find My app on your iPhone allows you to share the location of your phone with other users. This is helpful between family members, but double check this section for anything strange. For example, I forgot that I was still sharing my location with some old friends before we moved and a babysitter that we stopped using years ago. Oops.
- Apps List: Every app on your iPhone that wants access to your location will appear on this list. Some of them legitimate reasons to know where you are, like the various airline apps that you might have installed. But why does the IMDB app need to know my location 24/7? They don’t. They are logging my location and selling it to advertisers or trying to sell me expensive movie tickets, so they can make a commission on the sale. Not cool. Scroll down through the list and switch most apps from “Always” to “While Using The App”. Only grant “Always” access to your location to a few select apps like your security alarm.
You should be extremely wary of apps that want to “Always” use your location. Some games, for example, will track your location and then sell it to advertisers. Many games without ads do this to make money. That’s right, the free apps and games that you love, aren’t really free. You are paying for them by giving away your location data. Not only is this type of data sharing bad for your privacy, but it’s bad for your battery life.
Turn Off System Services
3rd party app developers want access to your location data, but they aren’t alone. Apple is also tracking and using your location in all kinds of creative and suspicious ways. Here’s what Apple is tracking and how to disable these services to help increase your privacy as well as your iPhone battery life.
Settings > Privacy > Locations Services > System Services
- Open the Settings app
- Select Privacy
- Select Location Services
- Scroll down to the very bottom and select System Services
Once you navigate to the System Services area in the iOS Settings app, you should see a purple arrow icon. This icon indicates that various apps and services are using your location. Here’s what the different icons mean:
- Hollow Arrow: An app our service may be able to use your location under certain conditions, like while using an app.
- Purple Arrow Icon: An app or service has recently used your location.
- Gray Arrow Icons: An app or service has used your location in the last 24 hours.
Turn off the following:
- Apple Pay Merchant Identification: Logs locations where Apple Pay is accepted.
- Device Management
- HomeKit: Apple was late to the market with their home automation products. Most people use either Google or Amazon Alexa. Unless you use Apple Home Kit, disable this setting.
- Location-Based Alerts
- Location-Based Suggestions
- Motion Calibration & Distance
- System Customization
- Significant Locations: Tap on this to review the locations that you’ve recently traveled. Apple saves this data to help predict what apps you use and when, like turning off your home security system first thing in the morning, or even predicting your commute time between home and work at certain times during the day. Scroll down to the bottom to clear this history if you want.
- Product Improvement: Why should you have to sacrifice battery life and your personal data to help improve Apple’s products? Until Apple starts to offering user payemnts or discounts in exchange for this data, you should probably turn this off.
- iPhone Analytics
- Routing & Traffic
- Improve Maps
Maybe:
- Call Network Search: Turn off, unless you frequently travel to other countries
- Compass Calibration: Do you go camping a lot and use the Compass app? If so, leave this on.
- Setting Time Zone: Turn this off. Your iPhone will know to switch time zones automatically anyway.
- Share My Location: If you currently use this feature to share your location with family members and close friends, then leave it on.
- Networking & Wireless: The U1 chip in newer iPhones, including the iPhone 11 and higher, uses Ultra Wideband to make Bluetooth more directional. Unless you AirDrop files on a regular basis or own an AirTag, then turn this off.
Leave On:
- Find My iPhone: Helps you find your phone in case you lose it as well as location family and friends.
- Emergency Calls & SOS: Allows anyone to use your phone to call 911
Opt Out Of Sharing Analytics & Improvements With Apple
Here’s another example of Apple using your data to help improve their products… at the expense of your privacy and battery life.
Settings > Privacy > Analytics & Improvements
- Open the iPhone Settings app
- Select Privacy
- Scroll down to the bottom and select Analytics & Improvements
Every time that Apple gets called out for using your data without permission, they add a hidden toggle button that most users will never use. For example, Apple was using recordings of users talking to Siri to help improve Siri, without permission. Do you rally want someone at Apple listening to you use Siri to search the Internet for something really weird, like plant p0rn? probably not.
Turn off everything:
- Share iPhone Analytics
- Improve Siri & Dictation
- Share iCloud Analytics
Turn Off Personalized Ads
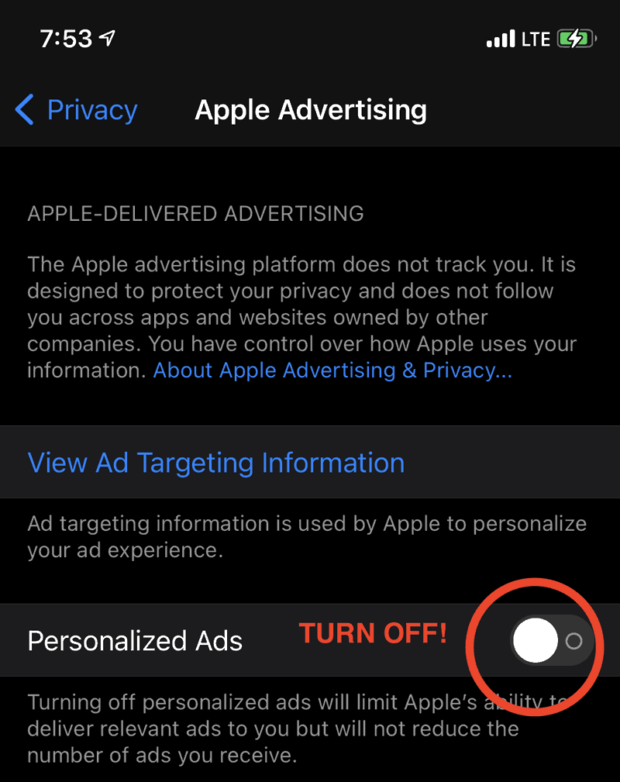
On this list of iPhone battery saving tips, turning off Personalized Ads is one of the more obvious options. Disabling this won’t stop you from seeing ads on the Internet, nor will it mean that you won’t see ads that are targeted at you. It just means that advertisers will use other data to deliver ads to your iPhone.
Settings > Privacy > Apple Advertising
- Open the Settings app
- Select Privacy
- Scroll down to the bottom and select Apple Advertising
Disable Tracking
Some apps, like Instagram and Facebook, have focused their core business around tracking your location to deliver content and ads to you. Your location is being treated as a commodity and companies are profiting from knowing things like how often you go to church, strip clubs, and what doctors you visit. Screw that! Turn it all off, off, off!
Settings > Privacy > Tracking
- Open the Settings app
- Select Privacy
- Select Tracking
Disable In-App Ratings & Reviews Requests
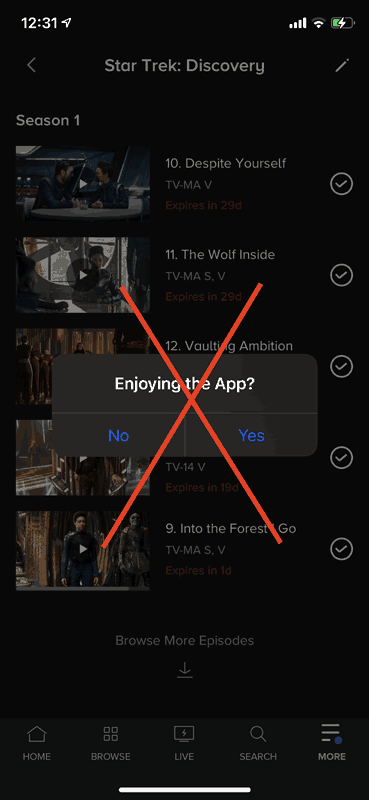
How many times have you been asked to write a review of an app that you are using? It’s so annoying right? These pop up requests for app reviews always tend to happen at the worst times too, like when you trying to pay for something or scan you mobile boarding pass at the airport.
Not only are these in-app review requests annoying, but they also use resources and will help drain your battery life. Turn them off.
Settings > App Store > In-App Ratings & Reviews
- Open the Settings app
- Select App Store
- Select In-App Ratings & Reviews
Push Mail
One of the biggest battery hogs on your phone is the Mail app’s constant need to check for new emails. Do you really need to see every email the exact second that it arrives in your inbox? Probably not. Changing this setting to either Every 15 Minutes or Every 30 Minutes will help save you a lot of battery.
Settings > Mail > Accounts > Fetch New Data
- Open the Settings app
- Select Mail
- Select Accounts
- Select Fetch New Data
- Turn off Push and change Fetch to Every 15 Minutes or Every 30 Minutes
Turn Off Background App Refresh
The apps on your iPhone are hungry. They will eat data and drain your battery’s power if left uncontrolled. Here’s what to turn on and off and how to tame them.
Settings > General > Background App Refresh
- Open the Settings app
- Select General
- Select Background App Refresh
The purpose of a background app refresh is to download new app content to your phone before you even open an app. For example, today’s top headlines could get pre-downloaded to your phone before you even wake up in the morning. While for some apps this might be beneficial to your lifestyle, do you open every single app on your phone every day? Probably not. So it doesn’t make sense to allow every app on your phone to use both battery and bandwidth, including cellular data, to download content that you’ll never see.
Apple knows that this feature is a massive battery hog and even admits it on the setting screen by saying “Turning off apps may help preserve battery life.”
Disabling Background App Refresh isn’t a big deal. The only downside here is you’ll have to wait a brief moment for your app content to load. The slight delay is worth the energy savings to your battery.
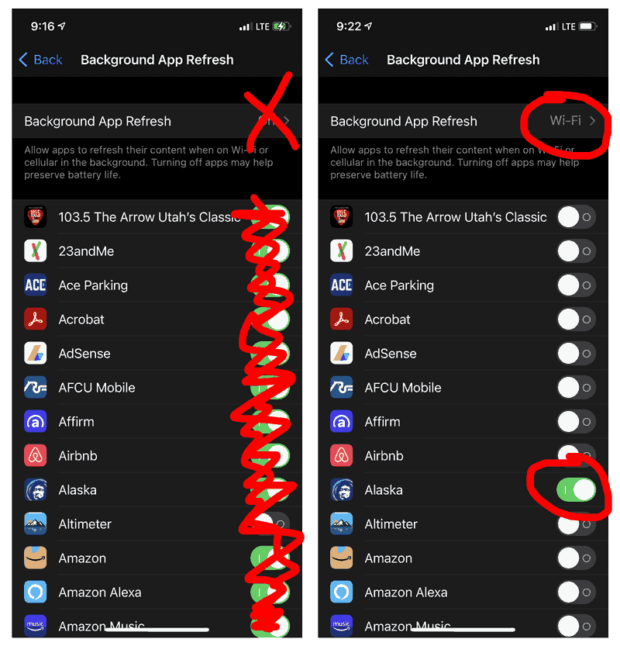
You have a few different Background App Refresh options. We suggest choosing Wi-Fi only for all of your apps unless you want to fully maximize your battery life. In that case, switch it to Off.
- Background App Refresh > Off: If you are trying to cut down on your monthly data fees with your cellar phone provider, then you should probably just turn Background App Refresh Off for everything. This will also help save your battery.
- Background App Refresh > Wi-Fi: Switching to Wi-Fi will help reduce your cellular data usage, but won’t help your battery.
- Background App Refresh > Wi-Fi & Cellular Data: This is the worst option for both your battery and your data usage but if your job or lifestyle requires timely data, then leave it on.
If you don’t want to disable Background App Refresh for everything, then you can manually adjust settings for each app. Just scroll through all of you apps on this screen and turn off everything that doesn’t need to constantly download data in the background. Definitely turn off any apps that you don’t use on a regular basis as well as any apps that have questionable data and privacy practices, like Facebook and TikTok.
Delete As Many Apps As Possible
As you might have noticed in this tutorial, poorly created apps can be both data and battery hogs. Sure you can spend the time to customize and limit how apps behave, but wouldn’t it just be easier to delete a lot of these apps?
The average smartphone user has 80+ apps installed, but we only use about 9 apps per day. These usually include email, web browsers, home automation, social media, financial apps and our favorite games. That number goes up to about 30 apps when we account for monthly usage. Shopping, entertainment, weather, and travel apps, like Airbnb, help account for the increase. But beyond that, what apps do you have on your iPhone that you haven’t used in the last 30 days? Probably a lot. Research shows that 25% of all smartphone apps are only used once after being downloaded.
What apps are on your 2nd, 3rd or 4th screens on your iPhone? When was the last time that you used them? Knowing that these unused apps decrease your daily battery life, do they really need to be installed, or would you be better off just reinstalling them as necessary? When in doubt, delete. Or as the Dalek‘s from Doctor Who would say, EXTERMINATE!
Also consider what apps can be deleted in favor of using a company’s website. For example, I still have a Facebook account, but I would never install the Facebook app on my phone. Not only is the Facebook app a massive battery hog, but I don’t trust Facebook when it comes to my user data.
Put Your iPhone Into Low Power Mode
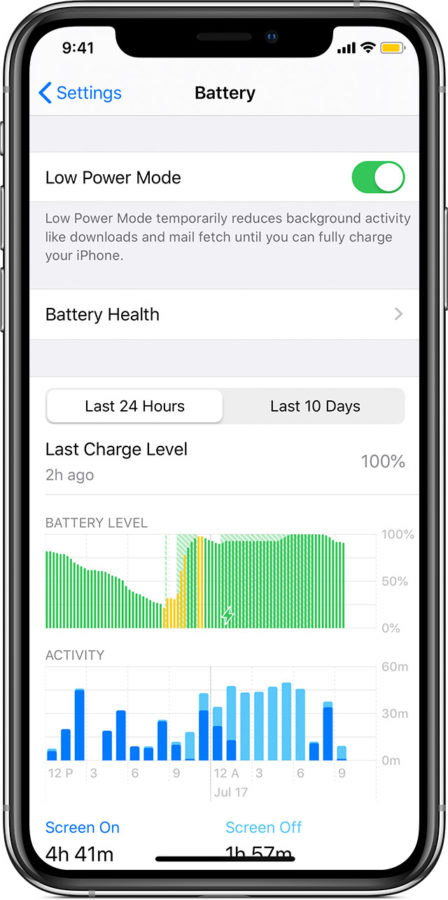
Another option that can help extend your daily iPhone battery performance is Low Power Mode. Your iPhone will automatically go into Low Power Mode as soon as it gets down to a 20% charge, but you can enable Low Power Mode at any time. I usually do this while traveling or attending conferences.
Settings > General > Background App Refresh
- Open the Settings app
- Select Battery
- Select Low Power Mode
The following features will either be disabled or work with reduced functionality while your iPhone is in Low Power Mode.
- Email fetch
- Background app refresh
- Automatic downloads
- Some visual effects
- Auto-Lock (defaults to 30 seconds)
- iCloud Photos (temporarily paused)
- 5G (except for video streaming)
When Low Power Mode is activated, the battery in the status bar will be yellow. Low Power Mode will automatically deactivate when you charge your iPhone’s battery to 80% or higher.
Understanding iPhone Battery Health
Nothing lasts forever, including the health of your iPhone battery. So how many years does an iPhone battery last? About two. The battery that comes installed with your iPhone is capable of about 300-400 full charges before it will start losing battery health. You will then start to notice your phone not being able to go all day without needing to be recharged.
Settings > Battery
- Open the Settings app
- Select Battery
- Select Battery Health
Unless you drop your iPhone and crack the screen, the battery is usually the first part to break down. After using your iPhone for and year and a half, you will probably see your Maximum Capacity drop to around 80%. By two years, your capacity could be as low as 60%.
Taking your iPhone to a company that offers iPhone battery replacement is a good idea. It can be an affordable solution to help extend the lifespan of your smartphone without buying a brand-new iPhone.
Easy iPhone Battery Saving Tips
Thanks for reading our list of iPhone battery saving tips. Have you tried disabling any of these settings already? Did it help extend your daily iPhone battery life? If you have questions or need additional help, just leave a comment below.
Is your iPhone's battery not as strong as it used to be? Here are some iPhone settings that you can disable to help maximize your battery life. #lowbattery #battery #iphonetips #deadbattery #iphone Share on XI’m a dog owner that loves poetry, vampires, mountain biking, and cosplay. I’m open to ideas and still trying to figure my SFO life out one blog post at a time. LF ISO SWF GSOH SI DDF.








 Is A CLEAR Airport Security Membership Worth The Money?
Leave a Reply