Are you having trouble removing the red-eye in one of your photos? Are your usual red-eye removal tools not working? Here’s how to remove red-eye in Photoshop manually without the red-eye tool.
Red-eye. What a pain. I have so many great photos in my photo library that are totally ruined because of red-eye. Sometimes I use the red-eye removal tools in apps like(Amazon link) iPhoto or Adobe Photoshop to fix problematic images, but unfortunately, they don’t always do a good job. But when the automatic tools don’t work, there are some manual ways to get rid of red-eye in Photoshop.
NERD NOTE: Red eye is generally more common with people with gray or blue eyes and children. This is because pale irises have less melanin in them and so allow more light to pass through to the retina. Children, despite superficial appearances, do not have larger pupils, but their pupils are more reactive to light and can open to the fullest extent in low light conditions.
How To Manually Remove Red Eye In Photoshop
The process of how to remove red-eye in Photoshop isn’t very hard. Anyone with basic Photoshop skills will be able to follow along. Here’s a Photoshop tutorial on how to remove red-eye in Photoshop 7.0 or higher.
Requirements:
-
- Any digital photo with a red-eye problem
- Adobe Photoshop 7.0 or higher (Mac or PC)
Open Your Red-Eye Image In Photoshop
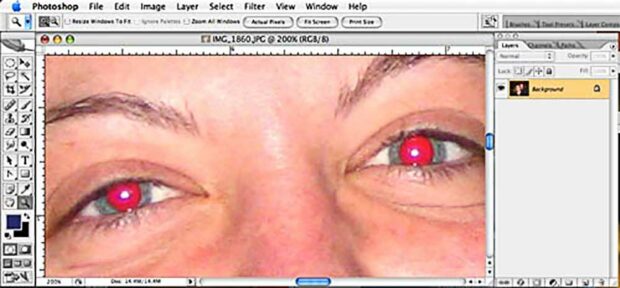
Open the image in Adobe Photoshop (File > Open) and make sure your Layers window is visible. If you can’t see your Layers window, then please activate it from the Windows menu (Window > Layers).
Create A Channel Mixer Layer
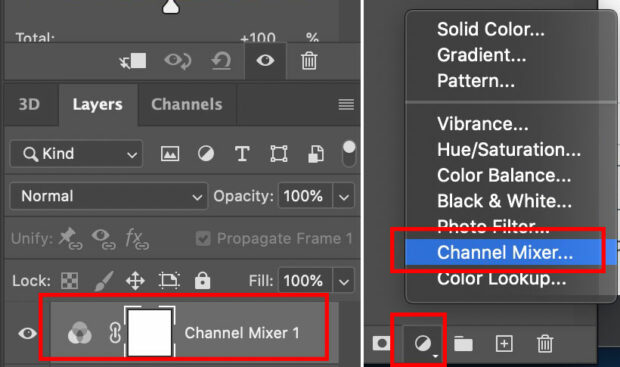
At the bottom of the Layers window is a little adjustment layer symbol. The symbol looks like a half white, half black circle. Click on the adjustment layer symbol and select Channel Mixer.
The Channel Mixer allows you to individually adjust the red, green, and blue values of an image. Since we want to get rid of the red, make the Red channel 0%, Green 50%, Blue 50%.
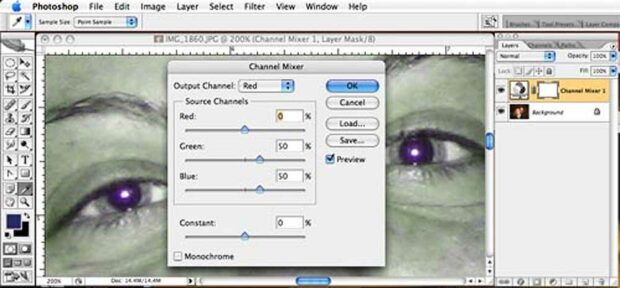
The person in your picture will look bluish-green like they were doing shots of whiskey all night and are about to puke. Yummy.
Add A Layer Mask To Your Channel Mixer Layer
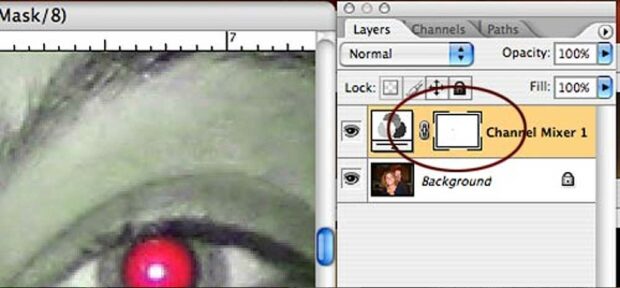
Look at your layers window again. The Channel Mixer adjustment layer should have a small white box to the right. This white box is a mask. Masks in Adobe Photoshop act like stencils. The Channel Mixer adjustment layer will ignore anything you paint black in this mask box.
Make sure your Foreground color is set to black and select a soft edge paintbrush. Click in the white mask box to make it active and paint the areas of the eyes that were red. They will become red again.
Invert Your Layer Mask
You should now have someone with a blue face and red eyes. Not exactly what we want, right? We need to reverse the mask or invert it. To invert the mask, select Invert from the Image menu (Image > Adjustments > Invert).
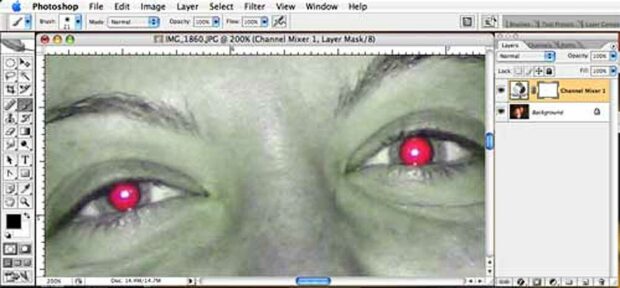
After you invert the layer mask, the person in your image should no longer look green and sickly.
Clean Up Your Edges
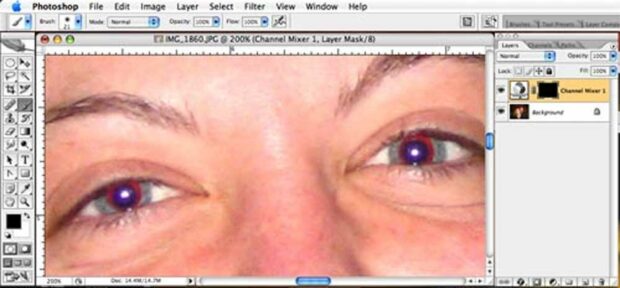
How does your red-eye image look? Do you see a reddish glow or ring around the eyes? If so, click on the layer mask box again to make it active, select white as your Foreground color, and then carefully paint around the edges of the eye with your paintbrush.
Soften Edges With A Gaussian Blur
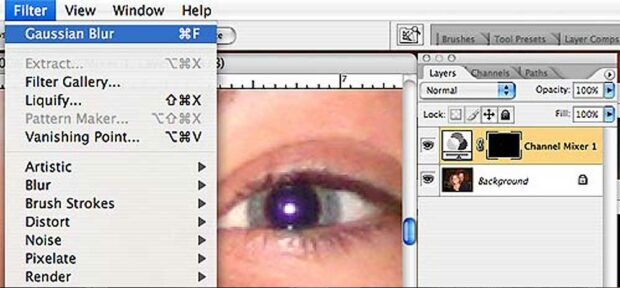
To soften the edges around the eye a little, you can apply a Gaussian Blur to the Channel Mixer’s layer mask. Click on the Channel Mixer layer mask to make it active. Then select Gaussian Blur from the Filter menu (Filter > Blur > Gaussian Blur).
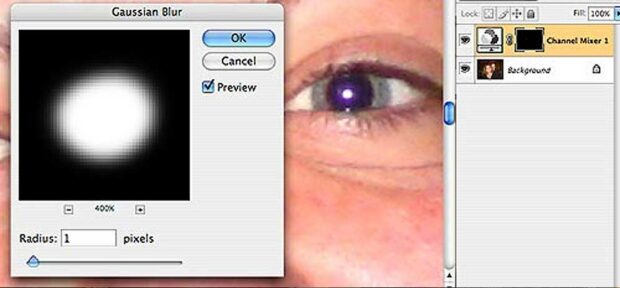
Your Gaussian Blur probably only needs a 1-3 Radius value. Experiment with different values until you’re happy.
Adjust Eye Color
Are the eyes too blue? Too purple? Still too red? You can double click on the Channel Mixer adjustment layer and modify the color settings. The image I used in this tutorial only needed 4% blue, not 50%. Every image will be slightly different.
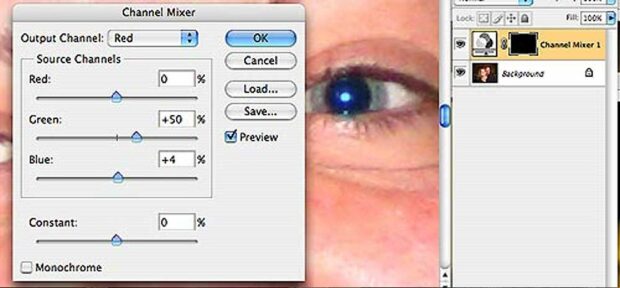
How To Get Rid Of Red-Eye: Photoshop Tutorial
That’s it. This concludes our Photoshop Tutorial on how to remove red-eye in Photoshop. You should now have a beautiful picture without any red-eye problems. If you have any questions or other techniques on how to remove red-eye in Photoshop manually, then please leave a comment or use our contact page.
How To Manually Remove Red-Eye In Photoshop - Tutorial ... #PhotoshopTricks #PhotoshopTutorial Share on XNERD NOTE: Adobe was founded in December 1982 by John Warnock and Charles Geschke, who established the company after leaving Xerox PARC in order to further develop and commercialize the PostScript page description language. Adobe played a significant role in sparking the desktop publishing revolution when Apple Computer licensed PostScript for use in the LaserWriter printer product line in 1985. The company name Adobe comes from Adobe Creek, which ran behind the house of one of the company’s founders.
Related Articles:
- How to Make An Animated GIF In Photoshop
- Famous Works Of Art Photoshopped With Apple Airpods
- Missing Missy: The Lost Cat With A Photoshop Battle
- Adobe Won’t Let You Photoshop Money – So Here Are 3 Simple Workarounds

Frank Wilson is a retired teacher with over 30 years of combined experience in the education, small business technology, and real estate business. He now blogs as a hobby and spends most days tinkering with old computers. Wilson is passionate about tech, enjoys fishing, and loves drinking beer.



 TODAY Show Launches ‘Where In The World Is Matt Lauer?’ Web Games
Leave a Reply
You must be logged in to post a comment.