Do you manage a blog or website? Want to verify your site with Pinterest? Verifying your site with Pinterest earns trust with Pinterest users and gets you access to Pinterest analytics. This tutorial will walk you through the steps involved in getting your Pinterest verification code and adding it to your site.
Log In To Your Pinterest Business Hub Account
Go to the Pinterest Business Hub on your computer (not phone) and sign in to your Pinterest account.
Select Account Settings

- Click on your Pinterest account icon.
- Then select Settings from the drop-down menu.
Claim Your Site
- Click Edit profile
- Under settings, select Claim.
- Then click on the Claim button under the Website’s section.

Choose One Of The Available Pinterest Verification Methods
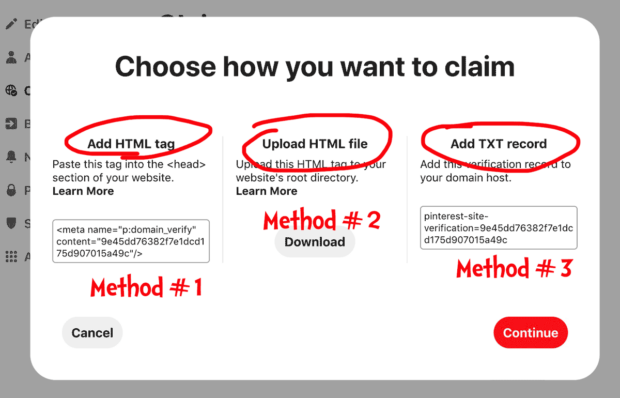
There are a few ways to verify your site with Pinterest. Choose one that will work for your situation and level of site access.
- Meta Tag: This is the easiest method, especially for WordPress users.
- Uploading A HTML File To Your Web Server: Harder because it requires that you have FTP access to your website.
- Adding A TXT record to your domain: This is the hardest method. It requires admin access to your domain manager (i.e. GoDaddy, NameCheap, NetSol)

Pinterest Verification Method #1: HTML Meta Tag
Out of the three verification options, this one is the easiest. It just requires that you add a small piece of code, called a meta tag, to the header of your website template.
- Copy the HTML meta tag from the Pinterest verification “Choose how you want to claim” screen.
- Add your meta tag to your site. There are a few ways that you can do this:
- Use the free SEO plugin Rank Math to verify your site with services like Google, Bing, and Pinterest, among others. In addition to helping you with your SEO, Rank Math will also automatically ping Google and Bing and send images to Pinterest every time your site gets updated. If you are currently using another lower quality SEO plugin like Yoast, then it might be time to switch to Rank Math.
- Use a WordPress plugin like Insert Headers And Footers. This plugin allows you to easily add code to your site’s headers and footers. This code can be anything from analytics tracking tags, ad code, or even your Pinterest verification ID.
- Your theme might have a section to add header code. For example, the popular WordPress theme called Newspaper has a section in its theme panel to add code to your header and footer. The disadvantage of adding code to your theme is that it will disappear when you switch themes. So it might be a good idea to use a separate plugin like Insert Headers And Footers.
- Manually edit your site and add the meta tag to the <head> section of the index.html file of your website before the <body> section. This option should only be attempted by advanced users.
- Skip to the Verify Your Site section in this tutorial to have Pinterest scan your site for your Pinterest verification code.
Pinterest Verification Method #2: Verify By Uploading An HTML File
Pinterest will provide you with an HTML file with your Pinterest verification ID. You will need download this file from Pinterest and upload it to the root level of your website’s server.
- Click on the Download button to download an HTML file containing your Pinterest verification code from the “Choose how you want to claim” screen.
- Use an FTP application to upload the file to the root or main level of your site. Don’t upload to a subfolder or Pinterest won’t be able to access it. Root level folder names vary by provider but some common ones are public_html, www, or wwwroot.
- Be sure not to rename the file when you upload it to your server. Pinterest will look for an exact filename match.
- Skip to the Verify Your Site section in this tutorial.
Pinterest Verification Method #3: Adding A TXT Record To Your Domain
This is the most advanced method available to verify your website ownership with Pinterest. This process is complicated and can have serious ramifications to your site if you do it improperly. Please consult the documentation with your domain provider for instructions. For example, here’s a tutorial on how to add a TXT record on GoDaddy.
- Copy the TXT record from the Pinterest verification “Choose how you want to claim” screen.
- Add a TXT record to your domain
- Skip to the Verify Your Site section in this tutorial.
Verify Your Site

- Go back to Pinterest.com if you’re not already there.
- Click on the Continue button on the Pinterest verification “Choose how you want to claim” screen.
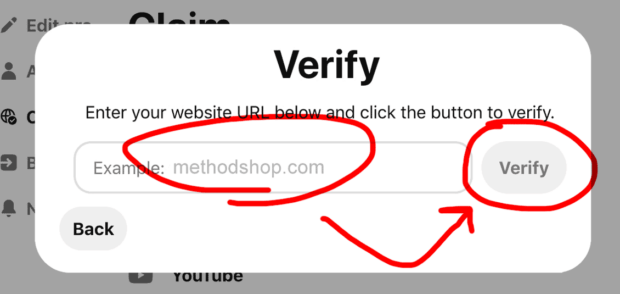
- Click on the Verify button and Pinterest will check and verify that your Pinterest verification code was successfully installed on your site.
That’s It! This Pinterest Verification Code Tutorial Is Complete!
Congrats! You just added your Pinterest verification code to your site. Buy yourself and beer. If this tutorial was helpful, please buy us one too. Just drop a dollar in our beer fund. These tutorials don’t write themselves.

Frank Wilson is a retired teacher with over 30 years of combined experience in the education, small business technology, and real estate business. He now blogs as a hobby and spends most days tinkering with old computers. Wilson is passionate about tech, enjoys fishing, and loves drinking beer.


 22 Inspirational Dr. Seuss Quotes To Help Motivate Your Life
Leave a Reply
You must be logged in to post a comment.